Tuesday, March 8, 2011

Tutorial Tuesday - Getting up close and personal with the auto modes of your camera

Hey guys, welcome to another addition of Tutorial Tuesday! I hope you guys enjoyed last week. Sorry that there hasn't been a whole lot of posting in between but it's surprising how intrusive things like work can be on the 'ol hobbies.

Today I want to expand a little bit on the first post, DSLR: a (very brief) introduction by talking a little bit about the different modes on a DSLR camera and taking a picture.

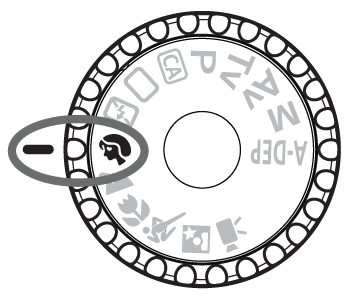
What my dial looks like, I know Nikon dials are different, but the principle is the same.

Now on a canon rebel camera the dial (pictured above) is divided into two distinct groups of photographic modes; the automatic modes and the advanced (or creative) modes. The two groups are split by the fully auto mode of the camera (the green square) with the pictures showing the different auto modes and the P, Tv, Av M and A-Dep represent the creative modes. The automatic modes, although very sophisticated and very appropriate for the beginner DSLR user, are pretty limiting to a photographer who wants more control over their images. Their very purpose puts the camera in complete control of the exposure. Lets not forget what I said in the last lesson, always remember that the camera has no clue what it's looking at. If you want to take control over what the camera is seeing and how it's being interpreted by you, you need to cross over into the "creative zone." (insert cheese twilight zone music here please!)

Now don't get me wrong, the auto modes are great and in a pinch, can provide some pretty top notch images. Here is an overview of the different auto modes on a canon rebel

1) Portrait Mode (face profile): In this mode the camera widens the aperture, providing a smaller depth of field. In most instances the pop-up flash fires to provide extra light (yuck!)

2) Landscape Mode (mountains): This time the camera narrows the aperture, providing a very deep depth of field. The shutter speed correlates to make a proper exposure.

3) Close - Up (flower): Utilization of this mode is very similar to Portrait mode, using a wide aperture for a narrow depth of field.

4) Sports (running man): This mode is helpful if you want to stop motion for things like action shots or sports photography. It utilizes a fast shutter speed to freeze movement.

5) Night Portrait (person with star icon): Mode to use when photographing in low light. This mode again uses the pop-up flash to provide adequate light in a dim setting and uses a longer shutter speed to expose the background.

6) Flash-Off (lightning bolt with strikeout): Most (if not all) of the auto modes with utilize the pop-up flash if needed to make a properly exposed photo (again in the opinion of the camera, no accounting for taste here!) This mode with disarm the flash and it will not fire. Useful if you want to auto expose and you know you don't want flash in the image.

So that's it folks, Tomorrow we'll look into the more fun modes!

Tomorrow: Advanced or Creative modes and why everyone should use them.

Saturday, March 5, 2011

Photog Friday - Inspirational Image

I am always inspired by other Photographers; I see every single image I look at as a learning experience. An opportunity to wonder what they were thinking, what gear they used and look through the lens at the image as they saw it while they were putting together the shot. So many decisions are made when building an image and a split second change in perspective can really make or break a photograph.

Maybe someday I can make images like these amazing people.

This past week a favorite wedding photographer of mine Erin Farrell posted a recent Wedding she was able to shoot in Jamaica. This image immediately grabbed me:


The Deep depth of field here adds so much to the image. The rule of thirds is strong with the beach acting as a leading line to the couple on camera right. Plus the image is just awesome, I'm sure the couple is happy with it.


Erin Farrell is a Wedding, Newborn & Portrait Photographer in Wilmington DE. Check her out here


Sorry guys the week kind of got away from me and I wasn't able to dedicate as much time to blogging as I would have liked. The good news is I am blogging right now from my brand new 15" MacBook Pro! I'm off to work for the weekend. Have a great weekend everyone!

Tuesday, March 1, 2011

Tutorial Tuesday: The DSLR; a (very brief) history

Hey guys! Welcome to my first EVER Tutorial Tuesday!

Today I am going to (very briefly) talk about what a DSLR camera is and (briefly) explain how it works


     The first ever known photograph was developed in 1826 using a pewter plate covered in a petroleum derivative which hardened when exposed to light. Then a whole lot of time passed and now we have the fabulous DSLR camera!

How does this amazing contraption work? It's basically a small and VERY powerful computer, thinking about it that way kind of helps when explaning it. Each DSLR has the same basic components:

1) The Lens: It might help here to explain that D-SLR stands for Digital Single Lens Reflex. This means that each camera is made up of a "body" (the bulk of the camerea, containing the shutter and the image sensor) and a seperate and interchangable lens (the front of the camera, the glass through which we see an image containing the aperature). Many professional photographers refer to their lenses as "glass." There are about as many lenses as there are subjects to take pictures of. Prime Lenses offer a fixed field of view and Telephoto Lenses offer a range of fields allowing you to zoom in and out depending on what you want to focus on in your image.

There is plenty to talk about lenses but i'm getting ahead of myself. Just remember for now that the lens is the window to your image, it can be interchanged in a DSLR and it contains the aperature.

2) The shutter: The shutter, contained within the camera body is actually a set of two sliding panels which move to expose light to the sensor chip. The first panel moves to start the exposure and the second panel moves after a designated amount of time (usually a fraction of a second) to cover the sensor chip and end the exposure.

3) Sensor chip: The "film" of a DSLR camera. Exposed to light by the shutter it converts thousands of levels of data from the scene and converts it into a digital image found commonly on the LCD screen on the back of the camera body. When you change the ISO settings in your camera you amplify the signal volume of the data coming from the chip and in essence making your sensor "more sensitive to light." Even though this isn't what actually happens it helps to think about that when you think about how your sensor chip relates to ISO.   

4) Mirror and Pentaprism: This is what makes a DSLR a DSLR. In order for you to be able to look through the lens of a DSLR camera there are two main mirrors inside the camera body that reflect the image captured by the camera. You can actually see the main mirror when you take the lens of the camera.

Sony Alpha DSLR; showing mirror
 The second reflective medium is the pentaprism which is what actually allows you to see the image correctly. The first mirror (pictured above) flips the image upside-down (think old school pin hole cameras) and the pentaprism using several angled sides to flip the image up correctly.


Here is a nice image which sums up everything I have just discussed. You can see the light traveling through the aperature in the lens, bouncing up through the mirror and through the pentaprism into the viewfinder that you look through. When you are ready to made the exposure the mirror moves away and the shutter does it's thing to reveal the senor chip. Pretty amazing isn't it?

That's about it in a nutshell folks, a pretty narly piece of technology that we can use to strech our photographic skills to hights never before imagined. Just always remember that even though this little machine is very intellignet, it has absolutely no idea what it is looking at. It doesn't know if it is seeing a candle lit room or a stadium filled with floodlights. It is up to US, the PHOTOGRAPHERS to accurately judge what WE want to take an image of and show the camera how to record it the way we see it. DSLR camers are a very powerful tool, but that's it. We are the painters and the camera is our brushes and canvas.

So that's it guys, my first EVER Tutorial Tuesday! Hope you guys learned something new and I can't wait until next week! Please forgive some of my technical jargon I know some of you are thinking ISO? WTF? No worries, it will all be explained in due time!


If you have any questions please leave me a comment!


See you on the other side of the lens!